Sunday, January 22, 2012

Futuristic computer

I called it the Orobouros Titan. It is an imaginary computer from the 2100's. With new advancements in physics recently made miniaturization of circuits could very well get much more drastic. This little machine is about the size of a standard USB flash drive and yet has many times the power of the machine on which I am creating my work and this blog. At least, that is what I'm imagining. Who knows what will really be possible then.

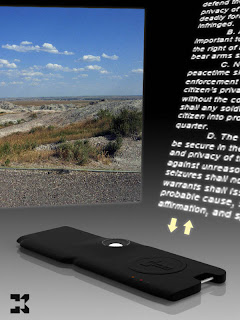
The idea is that it has projection capabilities as well as wireless access. The screen is also interactive. No need for a physical keyboard, just break the electromagnetic field to type or scroll the text (which is not from the constitution, but rather based on it- it's actually part of the notes from a science fiction story I have been working on for quite awhile).  When I get to the final image in which it is on the table with the other items, I might just create a keyboard that is projected onto the table (they have them now) .. though the key layout is probably not going to be the common one most people would be used to.


Friday, January 20, 2012

Spoons!

Well... at least one spoon of which I made an instance (a "virtual" copy which doesn't use up as much memory as creating an actual unique item. Changes made to the original are reflected in the instance) as I wanted to show both sides in one image.


Thursday, January 19, 2012

Coffee Mug

Coffee mug with coffee. Thinking of putting a spoon in it in the final scene.


Tuesday, January 17, 2012

Thermos

Here is the thermos I created for the room scene. I gave the render an environment just so it would have something to reflect.. when I finish the final scene, it will of course be reflecting the objects in that scene.


Sunday, January 15, 2012

Side project- Thanks you notes (part 2)

After some feedback I changed the wings to be more proportional. Also, I had noticed some kerning (letter spacing) issues on the type so I decided to fix those.


Also, I decided against posting the other one (the Star Wars one) after all, for copyright reasons. Sorry. I'd like to NOT get sued out of existence. I also went back into a past post and removed one of my old drawings from last year for this reason.

Thursday, January 12, 2012

Side project- Thank You Notes (Part 1)

I started a little side project the other day. I received some very nice Christmas gifts and instead of just dashing off the same old stuff I wanted to create something original and nice and it occurred to me I could do something for a portfolio piece in the process. The first one relates to a ceramic dragon I got. I am borrowing an idea or two from the old illuminated manuscripts but I am expanding on it. I decided instead of just drawing a dragon, I would model one.. as well as the T in thank you. First, here is the whole front of the card.

I also created a standalone higher resolution version of just the capital, with the dragon.


I started by modeling the T from a Template I created. Then after several unsuccessful attempts, I figured out how to model the dragon. I tried importing him from ZBrush back into Modo. I know it's possible but I think I went about it wrong. Perhaps in a future project I can do more in that area but since I was only going to show one side I elected not to go to so much trouble. I created a basic shape of the dragon, which I imagined being old and gnarly and tired, with shrunken wings (he's also a kind that doesn't have legs- much more snakelike than some other dragons and then sent it and the T to Zbrush. I did a render in zbrush after painting him (he has about 4 million + polygons) and then I later created the wings separately. I painted in the wing membranes in Photoshop as I wasn't sure how to model them- something to learn in the future. I finished the project and will print it off on 80lb card stock so I can mail it.

I also received a Star Wars ornament for Christmas from a friend of my folks, in appreciation for my helping her with her computer. So I am going to do one for her, except with a Star Wars / Sci fi theme. Look for it in an upcoming post as well.

Monday, January 9, 2012

New Project!

I have started on a new project. It's basically a room scene, except I plan on setting it a little ways in the future. This is a redo of a project I did when I was at FHSU. I had a class on 3d in which we had to build a room among other things. I don't even remember the program, though I think it started with an S. The room project was always my favorite of the things I did in that class, so I decided I would redo it except with everything better, and with the benefit of nearly 10 years new knowledge of the world that I didn't have at the time. At the suggestion of my good friend, Dave Simpson, I decided to start posting "in progress" pics of this project as I go along instead of keeping everyone in suspense.

This one is the main table, and as soon as I get the thermos finished, I will add it. I am creating each piece separately and to scale, so it will be easier to reuse them later for other projects. There are going to be quite a few more items in this scene- which will be better lit, I should add- than in the original, by the time I am done.

I modeled, textured and rendered it in Modo/Photoshop (the wood grain is made from scratch in Photoshop). By the time I am done, I might model a sculpture or two in Zbrush and bring it in, for decoration. We'll see I guess.

I thought I would include my two favorite pics from that original scene. Just to give some point of reference of where I am starting.


A few points on the above image:
• I hope Apple will forgive me as I can't really leave out the name and such without destroying the image. I no longer have the original 3d files to allow me to edit it. Not to mention there is a reference to an episode of  a particular tv show.. It was a class project after all. These will all get changed in the new version.
• There is, of course, no such thing as a G7. I didn't have any way of knowing they would switch to Intel chips later on after this was created. I do believe the trend will continue more in this direction of being smaller and smaller. though.
• You might think the floating display is sci fi.. think again. If you have a spare $20,000 or so.. you can get one.. hopefully in the future as technology gets better they will become more consumer affordable.
http://thefutureofthings.com/articles/40/heliodisplay-floating-display.html

Next is the stereo…

 
I was pretty happy with the stereo itself- particularly after the hours I had spent modeling and assembling it. The main flaws here are the stand and the floor. Bleh! Both need major help in the area of surfacing. The new version will be a different kind of stereo anyway. Also the lighting needs improvement I think.

I plan to do a couple different sets of images for this eventually- a daytime and nighttime version. The room will have windows of course. After all, how boring would a room be with no windows?


Monday, January 2, 2012

The December Project ...

This next pic is part- though not all- of a project that has taken me about a month to finish. I decided to learn Luxology's Modo 501 as I felt I needed to get back to basics of modeling. Rendering (turning a 3d scene into a still image or animation) is a fairly lengthy process, sometimes taking up to hours for each image, so as much as I wanted to have more to show, this is as far as I have gotten.


Normally, I post pics at 800 wide. However, as I am even more proud than usual of my month or so of work, I am putting it up larger (around 1600 px wide)

It seemed simple enough when I started. They were just keys, after all. However, what I had thought was going to be an easy project quickly turned into .. "The Project that Ate December". 

Literally. From a few days into December 2011 until just after New Years, 2012, I fought this beast. Maybe it is something that would have been easy for a more experienced modeler, but I was not terribly experienced in this kind of 3d work, so it was quite a learning curve to climb. I nearly gave up at least once in favor of a simpler project, thinking I should learn a bit more then come back but I realized if I gave up I might not come back, and I was determined that this project would not beat me! So, with encouragement from my friends, and some very good information from my close friend Dave, who knew more about keys than I did, I kept on trucking.

I got the idea from a tutorial I watched, in which the instructor, Dan Ablan, built a couple of keys. A couple. Well, not being one to do the bare mininum, I decided to take it to the next level, and I built keys that resembled- although they are not exact duplicates- the keys on my key ring- 11 in all. Yep. 11. Plus a set of fingernail clippers which are something I also keep on my keychain.

I thought I was going to need to do more post processing in Photoshop, but I decided after looking at the result, that I really didn't need that much.

Are they perfect? Definitely not! There are quite a few things I would do differently if I was starting this project over again, but I am not going to fuss about them. I am just going to take what I learned and apply it to new projects. But despite the flaws, I am quite happy with what I accomplished.